What is an LDR? (Explained Simply)
An LDR, or Light Dependent Resistor, is a small electronic part that can “see” how bright or dark it is around it.
Imagine it like a tiny electronic eye that reacts to light:
- When there’s lots of light (like sunlight or a lamp), the LDR allows electricity to flow through it easily.
- When it’s dark, it makes it harder for electricity to pass through.
So, an LDR changes its resistance depending on the amount of light it receives. That’s why it’s also called a photoresistor.
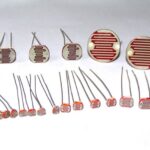
Standard LDR Size
These are the most common LDRs you’ll find in DIY and educational projects. They usually come in the form of small cylindrical components with two metal leads for connecting to a circuit.
Physical Dimensions:
- Diameter: Around 5-8 mm (0.2-0.3 inches)
- Length: Typically between 20-30 mm (0.8-1.2 inches)
What Is Arduino Nano:
Click Here To See Also: Arduino Nano Discription:Arduino Nano Projects
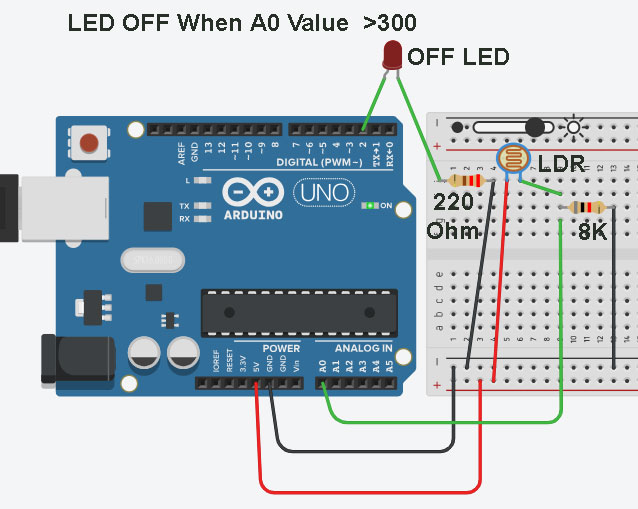
Project: Light Sensing (On/Off Led) Using LDR Sensor With Arduino Nano:
Objective:
To detect light intensity using an LDR and control an output (like an LED, buzzer) based on the brightness of the environment
Components Required:
- 1 × Arduino Nano
- 1 × LDR (Light Dependent Resistor)
- 1 × 8kΩ resistor (for voltage divider)
- 1 × LED
- 1 × 220Ω resistor (for LED)
- Jumper wires
- Breadboard
- USB cable for programming the Nano
Circuit Diagram & Connections:


Best Use Of Arduino With Ultrasonic Sensor
Best Use of Arduino With Ultrasonic Sensor (HC-SRO4) Learn how to use an Arduino with ...
Best Use Of Arduino With Relay
Best Use Of Arduino With Relay Learn how to control high voltage devices using a ...
LDR Sensor With Arduino To Observe Light
LDR Sensor With ArduinoLDR Sensor With Arduino Nano To On/Off Light Project –Light Detection Made ...